


A reader favorite, our wood closet shelving plans are easy to build, easy to customize, and budget friendly! It costs about $20 a linear foot (our 10 foot closet cost $200) to build. You'll love our free step by step plans with full diagrams and lots of reader submitted photos.
Do you need to organize your closets, but -
- Want a truly custom closet organizer - perfect for your things and no wasted space or compromises
- Want solid wood closet shelving (no particle board)
- Want a freestanding closet, that does not need to be attached to the wall
- Have minimal experience with tools, but are up for an easy and inexpensive project?
You can build your own wood closet shelving. It's easier than you might think and you only need a couple of tools.

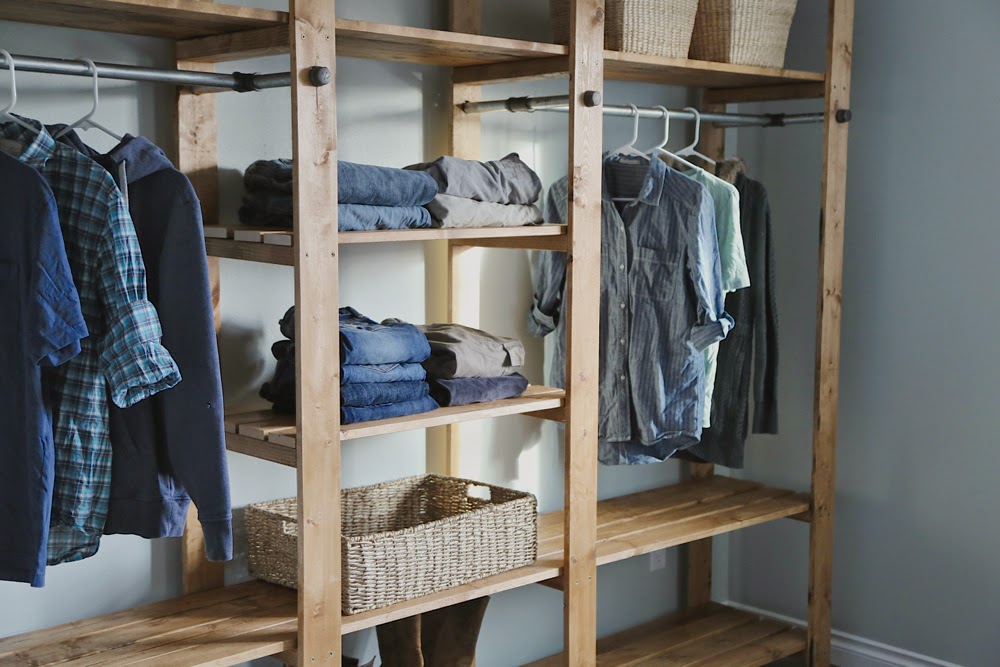
You simply build "legs" from 2x4s with 1x4s screwed to the outsides. Then you add 1x4s inside the legs, at whatever length your closet is. You can do this!
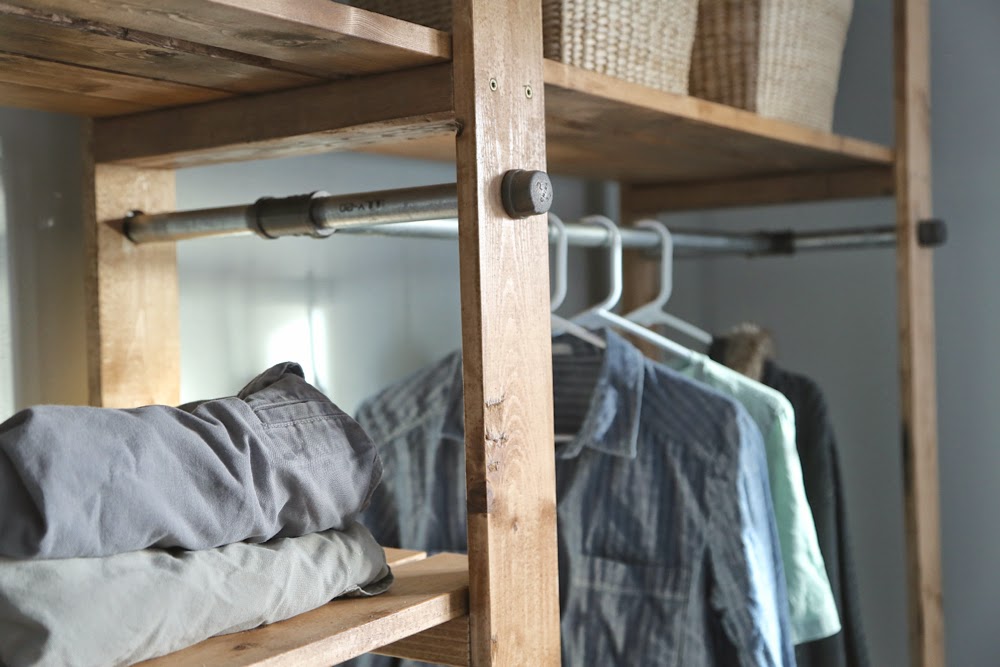
And the end result is beautiful and functional! Here's how my ten foot long closet turned out.
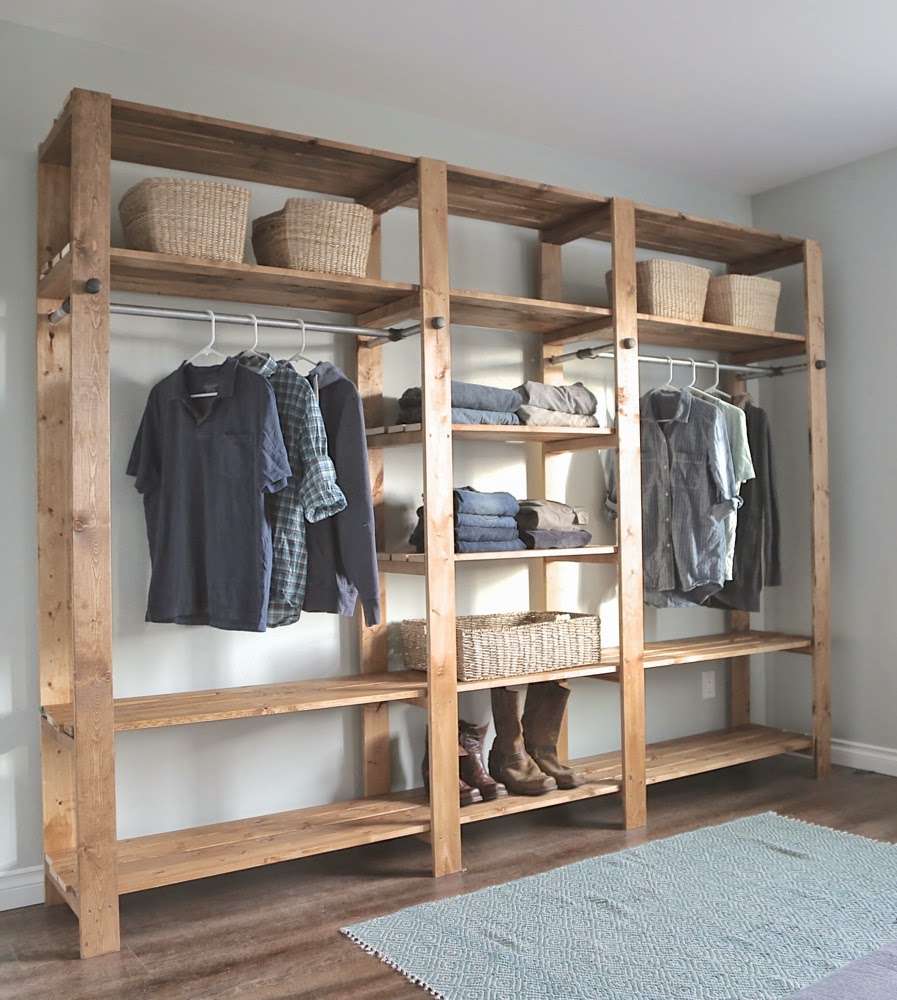
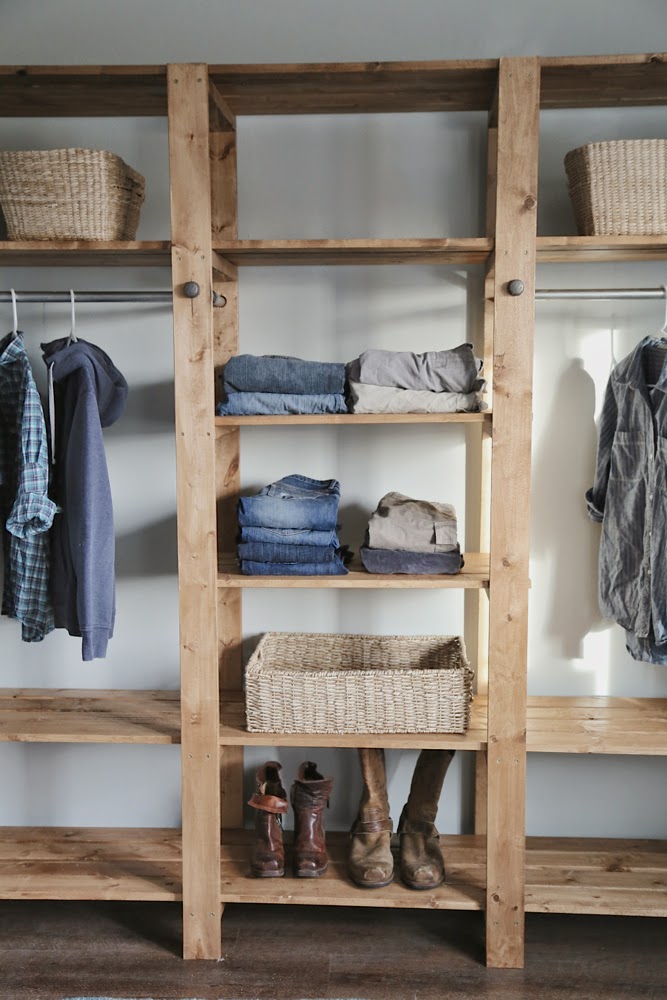
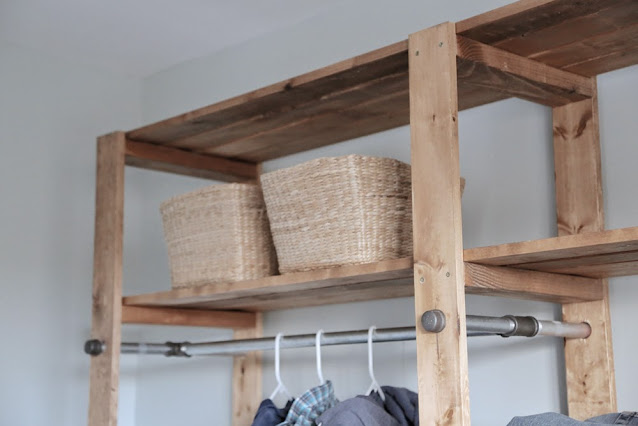
I also added a couple of smaller shelves in the middle, using the same method - 2x4 supports with 1x4s on top.
How much did it cost?
The cost was surprising too! Here's what I spent -
- Lumber (all new) - $120
- Pipes for closet rods - $60
- Stain and screws - $20
If I had used dowels for closet rods, this project would have been under $150.
I'd estimate between $15-$20 a linear foot to build your own closets.
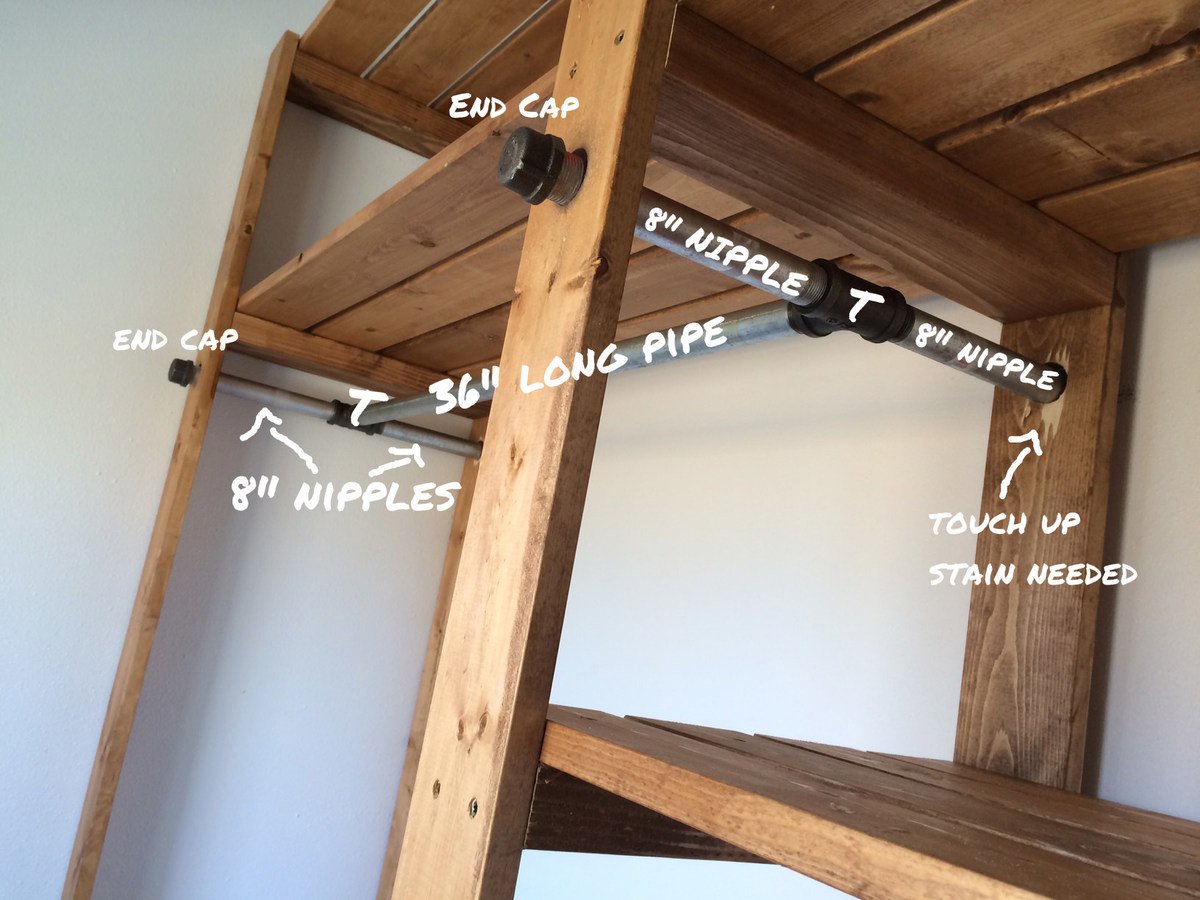
Industrial Iron Pipe Rods
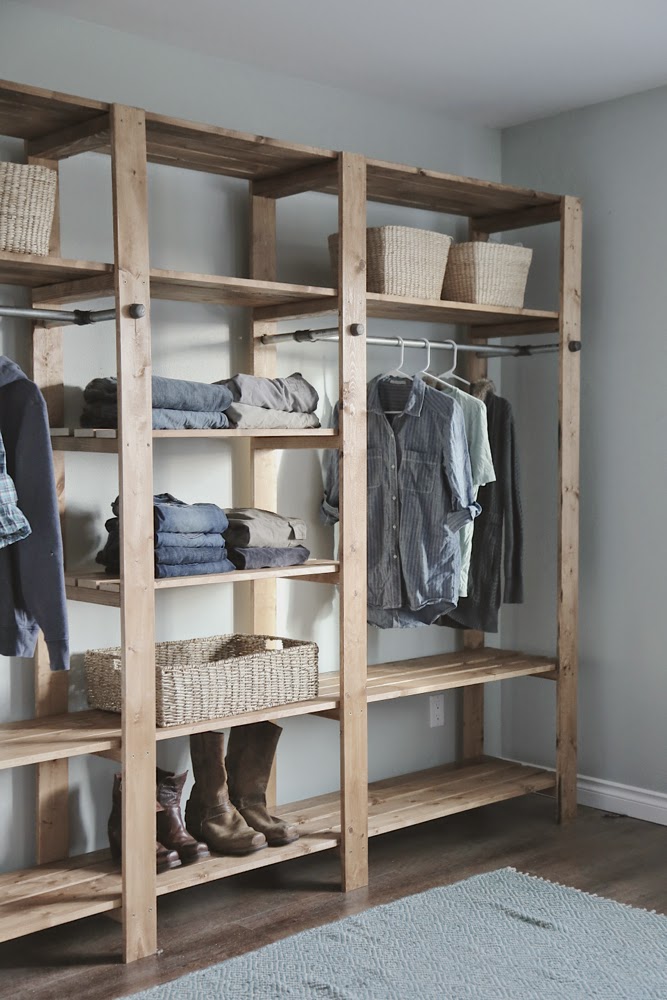
The iron pipes were a big part of the budget. I wanted the look, and it is beautiful!
You can save alot of money (and it's easier) by just using wood dowels as recommended in the plans. But we also wanted to provide instruction on how the iron pipes went together.
I used all 3/4" fittings. Per each rod, I purchased:
- (1) 36" pipe
- (2) Ts
- (4) 8" nipples
- (4) end caps
This was definitely the most expensive part, but the splurge was absolutely worth it!
Costs could be cut down by using a smaller pipe (1/2") or having less individual rods, and using longer pipes as the cost is in all the fittings.
But one thing to consider is the shelves above and below the pipes shouldn't span more than about 3 feet or they will start to sag, so I opted to make my closet rods using 36" pipes.

To get the closet to work with the 36" pipe pieces, I put the pipe fittings together first, then figured out how far apart I needed to space the legs. Then attached the shelving to the legs so it worked with my measurements.
Freestanding Closet
This closet is freestanding, but we do recommend attaching to the wall just to prevent forward tipping.
It's nice because you can build it in the garage, and then just set it up in the closet, or even in your room.

Wood Closet Shelving Plans
The plans for our freestanding closet is below.
If you build, please share, we very much appreciate your brag posts!
Pin For Later!


Note that this closet is most likely too tall to fit inside doorways and will need to be assembled in the closet (after you make the leg supports). If your closet is really tight, you may wish to shorten the entire closet by a few inches (measure you doorways).
Preparation
PER LEG SUPPORT (You'll need at least two leg supports, and additional leg supports every 3 feet or so)
- 2 - 1x4 @ 8 feet long (for the legs)
- 4 feet of 2x4 for the legs with closet rods and upper shelves, 8 feet of 2x4s for legs with closet rods, upper shelves AND and extra shelf supports
- I'd buy one extra 2x4 for things like supporting the closet rod (if not using the pipes) and for cutting around knots, cracks, splits etc
- 2-1/2" self tapping screws for attaching the legs to the 2x4 ends, two per joint
SHELVES
- 4 - 1x4 @ length of closet PER SHELF
- Additional 1x4s for smaller shelves if using
- 1-1/2" self tapping screws for attaching shelving or brad nails (recommend two per joint)
Wood stain or paint - I stained all of my boards first, before cutting. I let them dry overnight. After completing the project, I touched up unstained areas (cut ends).
PER LEG SUPPORT
- 3 - 2x4 @ 15-1/2" (shelf supports - make sure you measure your pipes first to figure how deep the closet needs to be to work with the iron pipe closet rods)
- 2 - 1x4 @ 81-1/2" (legs - you may wish to shorten these to pass through doorways)
SHELVES
- Per each full length shelf - 4 - 1x4s cut to length of closet
FOR EACH SMALLER SHELF
- 2 - 2x4 @ 15-1/2"
- 4 - 1x4 cut to length of smaller shelf


Please read through the entire plan and all comments before beginning this project. It is also advisable to review the Getting Started Section. Take all necessary precautions to build safely and smartly. Work on a clean level surface, free of imperfections or debris. Always use straight boards. Check for square after each step. Always predrill holes before attaching with screws. Use glue with finish nails for a stronger hold. Wipe excess glue off bare wood for stained projects, as dried glue will not take stain. Be safe, have fun, and ask for help if you need it. Good luck!
Instructions
Step 1

Build leg supports using 2-1/2" self tapping screws and wood glue.
Since I was using the metal pipe closet rods, I installed them at this step.
Step 2

I cut all my shelving to the length of the closet. Then I threaded two shelving boards on bottom shelf and two on second to top shelf.
I screwed the shelving boards to the outside leg supports, flush to the inside of the legs (will come back and add the middle shelving boards). Once the two outside leg supports were screwed down, I used a level to place the remaining two legs, with the closet rod determining where the legs should go.
Then I added the remaining shelving boards, screwing those down. Attach the outer shelving boards first, then evenly space the middle two shelving boards. I used 1-1/2" screws here. Once everything was tied in, it was pretty secure, but just for added security, I also screwed the shelving unit to the walls to prevent racking or forward tipping.
Step 3

Finally I simply measured the distance between the middle two legs, cut 1x4 shelving boards and more 2x4 shelf supports, and added two additional shelves.
Step 4

We love the look of the iron pipes, but it is expensive.
Here's a cheaper way that will function just the same.
Add more 2x4 @ 15-1/2" wherever you want a closet rod, but attach so the 2x4 runs tall, not flat and wide.
Then use closet rod sockets and wood closet rods cut to length in between the 2x4s run tall.
It is always recommended to apply a test coat on a hidden area or scrap piece to ensure color evenness and adhesion. Use primer or wood conditioner as needed.


Comments
brookifer86
Thu, 09/18/2014 - 07:41
Wowza!
This closet is SO beautiful! You're right, I can totally see this as a display shelf in an upscale store. Once again you hit it out of the park. Now I'm eyeballing my home wondering if there's a spot to fit this...
vjdoro7
Thu, 09/18/2014 - 10:45
Beautiful
I love the look of your storage unit. I have made similar things in the past. Unfortunately mine do not look as nice because they are loaded with stuff. Looks more like art when it is sparsely used and the clothing is sort of monochromatic. Very nicely done and artistically presented.
dewdrop
Thu, 09/18/2014 - 11:31
Love the look of this!
Maybe I am that one person! I've been debating building your other closet organizer but just haven't been certain I could haul around and install it due to the weight of it. This one will do the trick and I love the industrial look! Thank you!
mike0mike
Thu, 09/18/2014 - 12:19
Noob question
What type of wood 1x4 did you use?
In reply to Noob question by mike0mike
Jacob White
Thu, 09/18/2014 - 12:30
Hi - just those cheapo
Hi - just those cheapo whitewood/pine boards and 2x4s :)
kmatt55
Sat, 09/20/2014 - 18:09
This is brilliant and
This is brilliant and stunning! Love it!
Liam
Sun, 10/19/2014 - 17:51
Lumber Dimensions
Are those true 1x4s or 3/4x3.5s?
Wondering if 3/4" thick would be strong enough, especially once weighed down with items.
And did you just use regular 2x4 studs?
Thanks!
davidduncan0
Mon, 12/29/2014 - 16:17
Dimensions
Liam, I hope it's ok for me to answer.
Any lumber you get from the home stores are going to have the smaller measurements, it's just easier to say "1x4". As far as being strong enough, the plan calls for 4 boards across, so the weight will be distributed, with each board taking 1/4 of the weight. Hope this helps.
David
Backinservice
Tue, 11/25/2014 - 10:53
Nice project
I like it was suprised to see no Kreg pocket holes! But does that mean pocket hole joinery isn't strong enough for storage shelves? If it is, what are the best methods for heavy shelves?
davidduncan0
Mon, 12/29/2014 - 16:22
pocket holes
Back, (or is it Service?)
I think the industrial look to the shelf lends itself to the lack of pocket holes. As far as being strong enough, I built the "industrial rolling shelf" for my garage using the Kreg, and it's loaded to the hilt with no issues. I think this one was designed to be quick and easy. Pocket holes are great but they do add a lot to the time to build. Just my opinion. Thanks, David
charid
Tue, 12/30/2014 - 11:30
nice
great for the laundry room.
mrsajsmith
Mon, 02/23/2015 - 15:13
price?
Where are you buying your materials? I priced this out as shown, at 8' length. My price is $400, not including stain or screws, making it over double what you said it cost you. And yes, this is with the cheapest wood at the store. Please let me know as I'd like to build this while keeping costs down.
jpurp
Sat, 01/16/2016 - 23:48
Price
What price were you quoted on 2x4's and 1x4's? None of them should be more than $3.00 each and that would be what I pay in Canada where everything is more expensive and I'm rounding up the price. Any big box store will carry an inexpensive whitewood. Did you go to a specialty store and get quoted on a nicer type of wood?
Sarine
Thu, 11/05/2015 - 04:46
Advise to get cedar wood planks?
I'm new into the woodwork world and was wondering if cedar wood planks work for this project?
Sarine
Thu, 11/05/2015 - 08:57
Closet width? 15 1/2 inch instead of 24"?
Shouldn't a closet be at least 24" deep? From what I understand from the plans, this closet is only 15 1/2". Can someone please explain it to me?
In reply to Closet width? 15 1/2 inch instead of 24"? by Sarine
JoanneS
Thu, 11/05/2015 - 13:43
Closet system dimensions
Hi Sarine,
This plan is for the organizer that goes inside the closet. Most of the organizer systems you find for sale are about this depth. If you add in the thickness of the front and back boards in this plan, (2 x4's are1.5" thick) to the 15 1/2" shelf, it makes the depth at 18.5 inches. In a 24 inch deep closet that leaves you with a few inches of space in front of the organizer inside the closet. DIY is so wonderful because you can customize the piece to fit your individual needs. You could change the depth by adjusting the size of the side pieces and the shelves. If you are putting this inside of a closet, the depth in the plan will work great for you! Happy building! :) Joanne
Phoenix builder
Wed, 02/17/2016 - 14:24
Industrial Closet
As I'm getting ready to tackle this project, I just have a question about the project. The self tapping screws , what is the gauge of them. Are they #8, #9 or #10?? Does it matter the gauge?
Thanks!!
[email protected]
Tue, 07/26/2016 - 08:05
Great DIY Closet
We will be renovating our master bedroom entirely and I wanted to build our new master closet myself and wanted a rustic look. So glad I found this project of yours. I will be doing this for sure. Love how you made it simple and rustic.
Do you have any ideas for covering up a window that may be behind out bed? I will have some old shutters I was thinking of using. Thanks
G Madore
Maine
benjaminrogers
Thu, 08/03/2017 - 07:35
Build around a Corner
Using this design how would you construct it to wrap around the corner? We live in a 1920's home and there are fireplace bump outs in the bedrooms and little to no closet storage.
Thanks,
Ben
KW78
Tue, 01/16/2018 - 07:53
Doors
I am thinking of building a bigger shelfing system covering the entire wall. Are there ways to add doors to keep the dust away?
kaprince
Sun, 09/15/2019 - 17:26
Closet X 2
Can't wait to try this!
Dland1961
Fri, 12/27/2019 - 05:34
Closet
I built this for a friend. It came out great! Very solid.
Chelsea Burns
Tue, 01/07/2020 - 10:29
Deeper possibility?
Hi! Do you think these plans would work if the shelves were about twice as deep, 30"? Or would the bracing start to be unstable and/or sag? Thanks!
Debramer1
Sun, 08/16/2020 - 00:53
New house
New house
kbaumer
Wed, 09/23/2020 - 09:02
What is the length of this…
What is the length of this shelf?
mike2k
Tue, 09/29/2020 - 09:32
Pictured closet length?
Curious what the length of the closet pictured is. I assume 10 feet or so? Assuming legs need to be at least 3 feet apart, but the center shelves look like they are less than 3 feet in length, so 8 total length maybe?
KeyserSose78
Thu, 11/05/2020 - 09:25
I found a couple of shower…
I found a couple of shower curtain rods at a garage sale for $1 each and used those to cut down cost. I built the whole project for around $80. Thanks for the plans, my wife is very happy with her new shelves and hanger space.
TryDoFix
Sat, 12/26/2020 - 19:09
Adding doors?
Exactly what I was looking for! If I wanted to add a sliding door to the whole closet, do I need to add one more brace outside and hang the door plus track there? Has anyone tried to add doors?
hauxy
Sat, 01/09/2021 - 08:14
Can we add a sliding door?
Yes- I have the same question. I have a busted up Ikea closet I’m getting rid of, but want to recycle the sliding mirror door and would like suggestions on how best to add it (or some form of sliding door) to this system.
The Winging-it Wife
Wed, 06/09/2021 - 08:34
Tweaked measurements and love
Did cry in frustration that my first-step frames were not square when I lined them up with each other. But used a temporary cross bracing to make them line up the. The shelving boards did the rest! I deepened the initial plans by 2 inches from 15.5” to 17.5” as I didn’t want the hanging clothes to stick out at the shoulders and I’m glad I did! That meant the shelving boards had about a 1 1/8” space in between. The three shelves in the “tower” side I spaced 16” from the bottom of the 2x4 shelf support piece to the top of the next 2x4. I only did that with the with the bottom four shelves. I have baskets that are 13.75”/16.5”/10.25” and they fit perfectly on those shelves.