How to render SQL Server acyclic blocking graphs using Visual Studio Code, TypeScript, NodeJS and TreantJS – Part 2
Recap
In the previous blog post (you can find it here: https://bit.ly/bcts1) we've seen how to setup a NodeJs REST application in Visual Studio Code. We've also seen how easy is to debug the application without leaving the IDE. In this second part, we will see how to wire some data to a gorgeous library: TreantJS. In our example, we wanted to be able to graphically visualize the SQL Server acyclic blocking graph. Let's review the server code:
This code is fairly simple. All we do is register a path (/spwho) in express. That URL will trigger the spWhoService.GetEntries() code. That code, upon success, will return a JSON representation of the sp_who stored procedure.
The service, in case you are wondering, is like this:
As you can see we are returning a strongly-typed array - in fact a promise to be fulfilled. We use an interface in order to render unit testing using mock services easier.
Next step
What we need now is to create an html page that will call our web service, do some data manipulation and then render the graph. We want to do it in TypeScript (obviously) and we want to use Visual Studio Code.
Debugger for Chrome
There are many techniques for debugging a TypeScript transpiled code. Visual Studio Code, using the Debugger for Chrome plugin, has first class support to web debugging. You can set breakpoints in the code and, upon hit, the browser will pause and surrender control to Visual Studio Code. From there, you will be able to inspect the variables, call stack, execute a step over, step into, and so on.
Dual debugging
We want to be able to debug the NodeJs server and the Chrome webapp so we can follow the data from end to end. But how to debug a NodeJs server and a Chrome webapp at the same time in the same Visual Studio Code solution? Ideally we want to setup two different Visual Studio Code solutions, one for the NodeJs server and another for the webapp. But the webpage will be sent by the server (so the code must be there), not by the webapp solution. There are many ways to solve this chicken-and-egg solution. I usually end up using symbolic links but any vendoring technique should be fine.
In my case I will have the final web folder in the NodeJs solution (to be exported as static files by express). I will not, however, use it from there. I will, instead, create a new solution specific for the webapp and link the web folder from the NodeJs solution. This way I can work on my webapp solution and publish only the transpiled files (which I would want to do anyway). I'll be able to debug the webapp from my source TypeScript files since I'll configure the source maps. The downside of this technique is that is very git unfriendly. You can solve this limitation with git submodules but it's beyond the scope of this article (for more info, see here:https://git-scm.com/docs/git-submodule).
This is how the webapp folder appears in my solution. Notice I've also linked the typings folder so the code will compile successfully in both solutions.
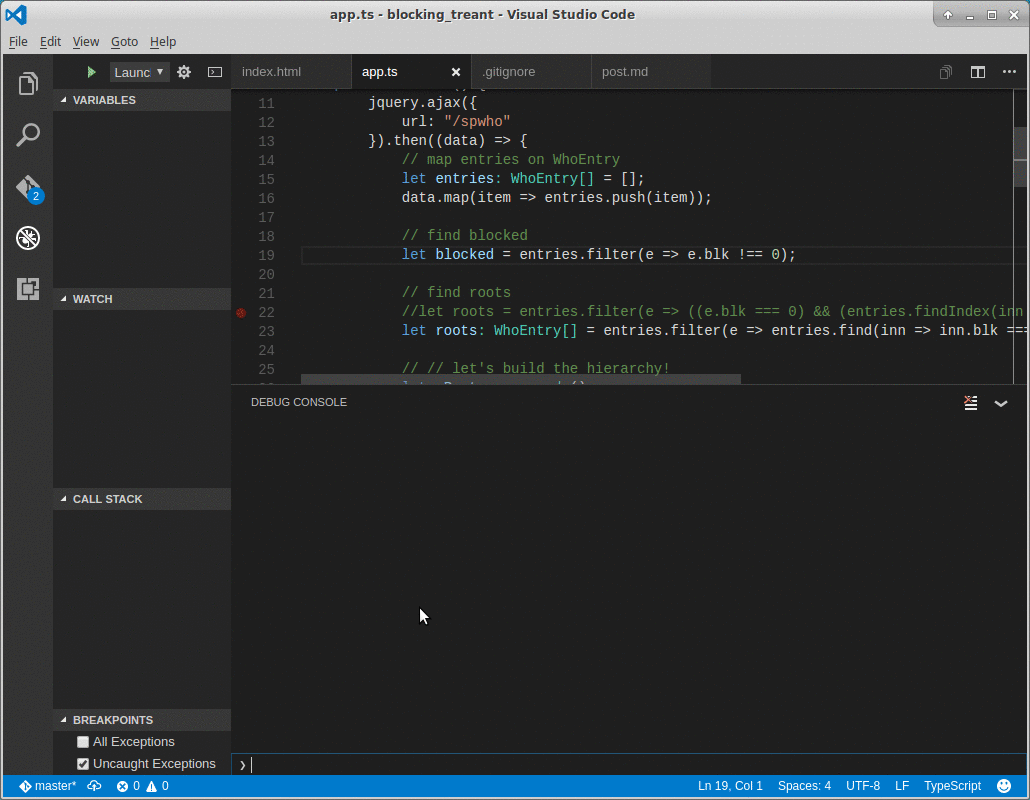
Once set - I will skip the details now - you will be able to hit breakpoints in Chrome even if the source code comes from another solution. Here I show you how the debugging works.
TypeScript and browsers
One of the main problems when working with browsers instead of NodeJs is the complexity of module loading. Fortunately there are many high-quality module loaders. I use SystemJs (https://github.com/systemjs/systemjs) because I find it clear. Your mileage may vary, pick the one that better suits your needs. Here is a very simple SystemJs loader (extracted from index.html):
We don't need many advanced SystemJs features because the transpilation process will be handled by tsc (and Visual Studio Code) so all we have to do is to point it to the dependency folders.
Mapping JSON to strongly typed entries
In our NodeJs server solution we publish, as JSON, entities called WhoEntry. These are the representation of a single sp_who row.
Our client webapp, however, receives the JSON which is not strongly typed. In order to get the WhoEntry class back all we have to do is to map the JSON to our class:
This of course works since we have a non-written contract between server and client. Using the same source file helps to avoid conversion errors.
TreantJS
TreantJS requires you to create a hierarchical structure: any node can have zero to infinite childs and so on. What we will do is to start from the root SPID (the blocking one) and then add its blocked SPIDs as childs. Then, recursively, we'll add their own blocked SPIDs until there are no more blocked SPIDs. But first how can we identify the root blocking SPID?
Root blocking SPIDs
The logic is simple. The root blocking SPID is the one blocking something but not blocked by something else. In other word, there must be at least one WhoEntry with blk equals the SPID. And the SPID's blk entry must be zero:
Notice in the code we relaxed the assumption of having only one root blocking SPID in a given scenario.
Recursively add blocked SPIDs
The recursive function can be functional - better - or purely side effecting like this one:
TreantJS again
Now that we have the hierarchical structure in place all we have to do is to add some mandatory fields (container, etc...) and create the Treant object. We choose to hide the root node since it does not give any useful information. You can experiment a bit, TrantJS is very powerful and customizable.
Final result
Let's try our solution. Fire the NodeJs server (remember to configure the SQL Server connection properties or use the mock service) and open a browser pointing to https://localhost:3000. You should see the blocking graph (or nothing if you don't have any blocking, play with TRANSACTIONs to create one!).
For example, suppose to have this output from sp_who:
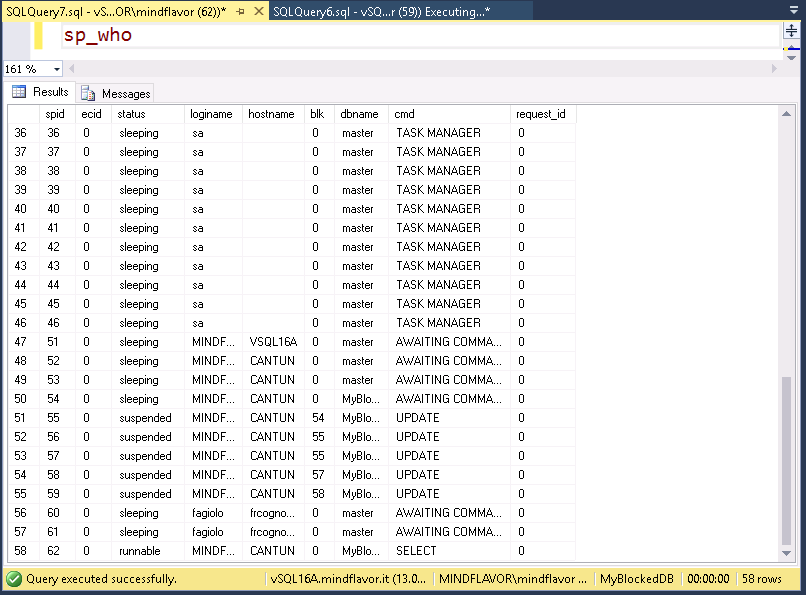
Our code will create this JSON:
TreantJS ignores the extra fields, like whoEntry in our case. We added it to make the recursive function easier.
This JSON, given to TreantJS with a very basic CSS, gives us the expected result:
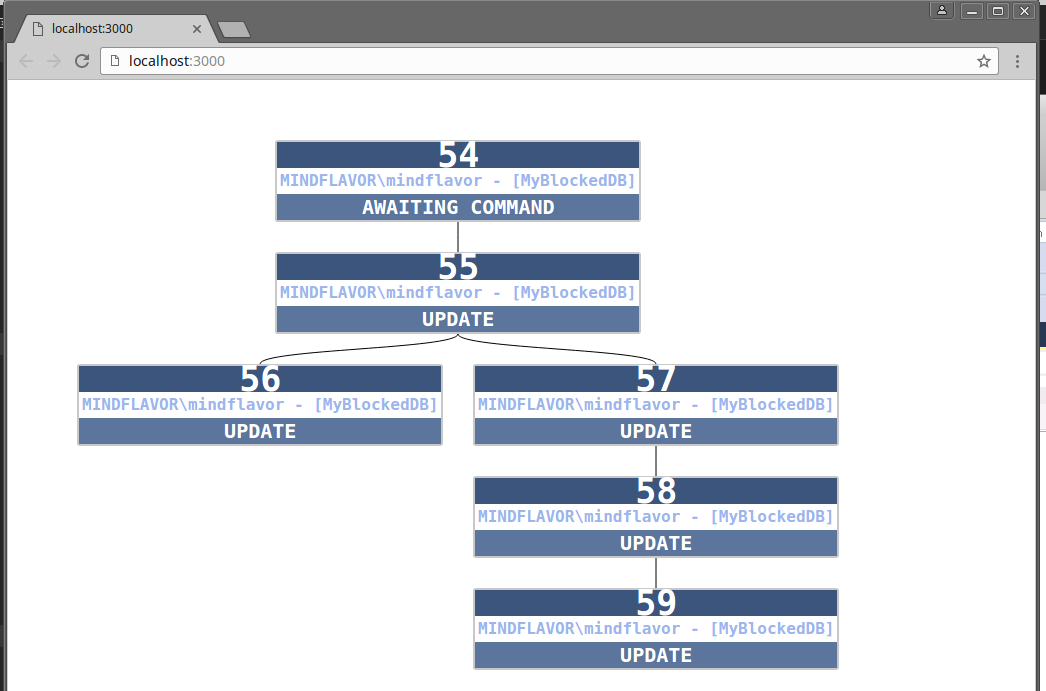
As you can see from the picture above, someone (SPID 54) left a transaction open! All in all, the sloc is minimal and the result is useful. If you export the connection string you will have a handy tool to impress fellow DBAs: all you need is a NodeJs installation. Even your laptop can do that!
Happy coding,